


403
Sorry!!
Error! We're sorry, but the page you were looking for doesn't exist.
Everything Users Need To Know About Drywall Anchors: The Ultimate Guide
|
Anchor Type |
Load-Bearing Range |
Installation Difficulty |
Applicable Scenarios |
Most Common Problems Remo |
Removal Difficulty |
|
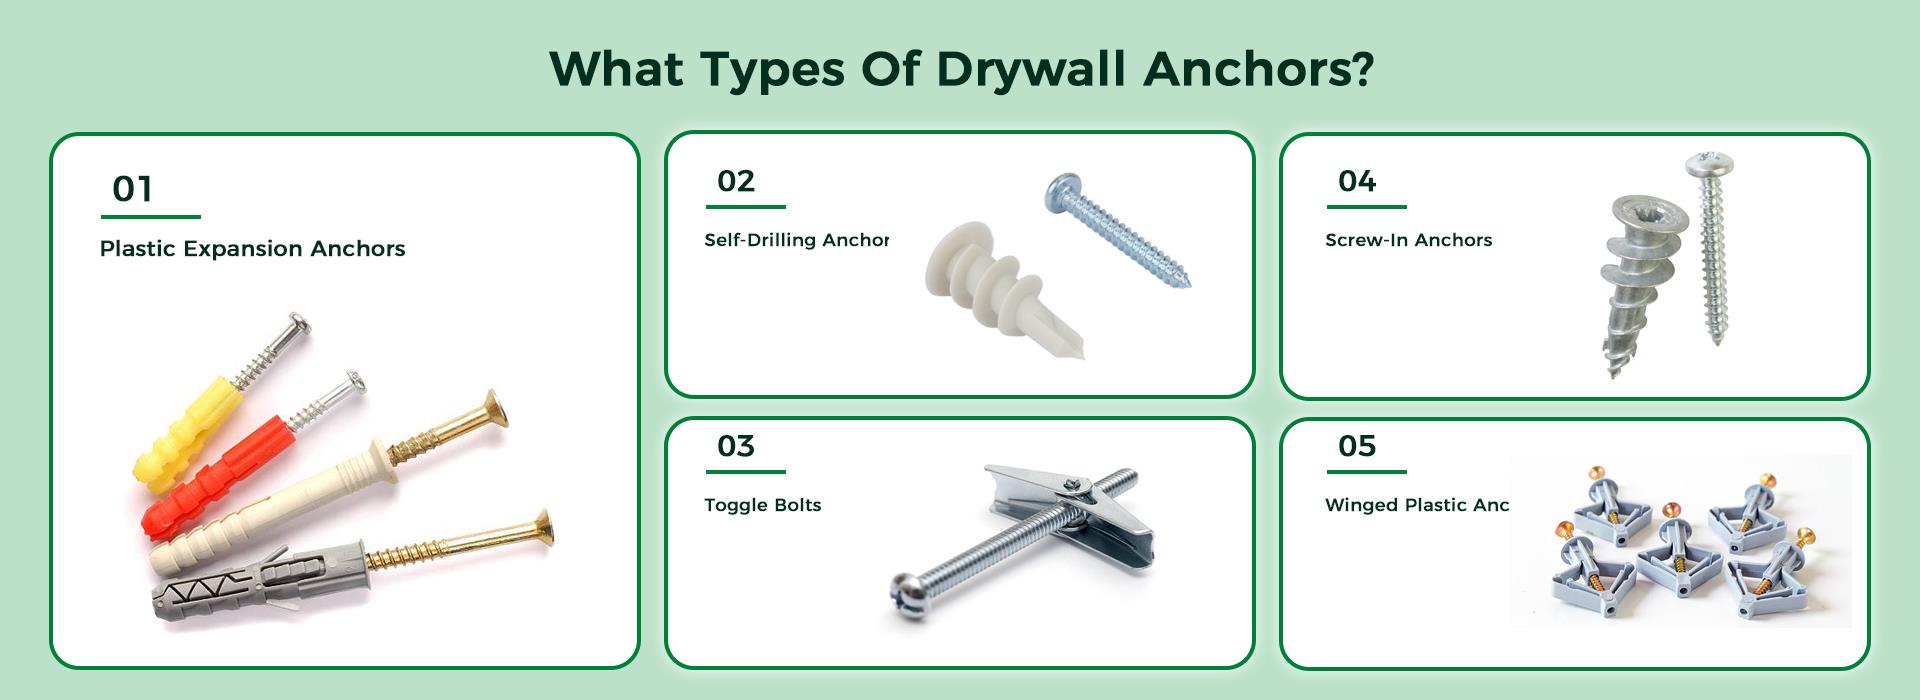
Plastic Expansion Anchors |
10-25 pounds (4.5-11kg) |
⭐⭐☆ |
Small picture frames, photos, light decorations |
Overweight easily damages the gypsum board |
Medium |
|
Winged Plastic Anchors |
15-30 pounds (7-14kg) |
⭐⭐☆ |
Slightly heavier picture frames, small mirrors, towel racks |
Improper installation may cause insufficient expansion |
Medium |
|
Self-Drilling Anchors |
10-30 pounds (4.5-14kg) |
⭐⭐⭐☆ |
Light and medium-loaded items that do not require drilling (wall clocks, small shelves) |
Repeated screwing may cause thread slipping |
Easy |
|
Toggle Bolts |
50-100+ pounds (23-45kg+) |
⭐⭐☆ |
TV brackets, heavy mirrors, wall cabinets |
The bolt head is exposed and needs to be covered |
Difficult |
|
Screw-In Anchors) |
25-75 pounds. (11-34kg) |
⭐⭐⭐☆ |
Medium-heavy loads. (Bookcases, lamps, medium-sized shelves) |
Poor quality products can easily tear the edge of the drywall when screwed in |
Easy |
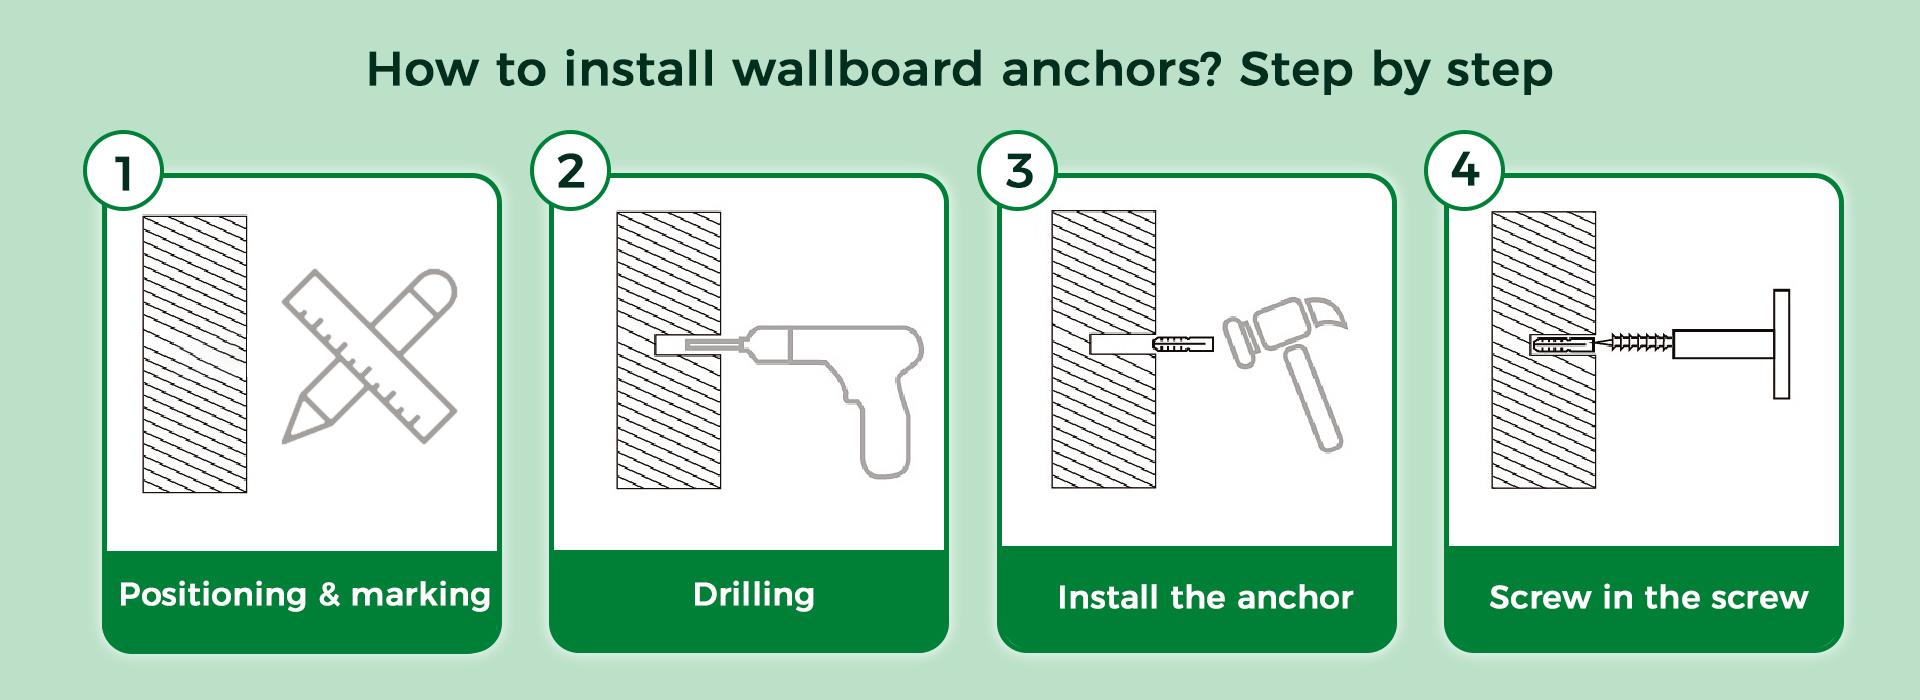
How to install wallboard anchors? Step by step
Choosing the right anchor is half the battle for installation. Remember the key steps:
1 & marking:
After measuring the tool, use a pencil to accurately mark the drilling point on the wall.
2 (if necessary):
Choose a drill bit of the right size according to the instructions on the anchor packaging. The drill bit diameter is usually the same as the outer diameter of the anchor (or slightly smaller). If the hole is too large, the anchor will not hold firmly!
When drilling, keep the drill bit perpendicular to the wall and drill steadily. Don't drill too deep! The depth should be slightly deeper than the length of the anchor to prevent the anchor from hitting the wall stud inside. Drill gently to avoid cracking the drywall.
3 the anchor:
Plastic expansion tube/screw anchor (need to drill): Align the tip of the anchor with the hole and gently tap its base with a hammer (or press directly with your hand) until its flange (base) is completely close to the wall. Don't knock too hard and crack the base!
Self-tapping anchors/screw anchors (no drilling required): Use a screwdriver or drill (at low speed!) to drive it vertically into the marked point until the base is completely against the wall. Stop when you feel a noticeable increase in resistance.
Butterfly anchors: Loosen the bolt a few turns and push the folded“wings” into the drilled hole. When the“wings” are completely through the wallboard, they will pop open or get stuck (you may need to gently pull on the bolt). Then hold the base of the anchor (to prevent it from turning) while tightening the bolt until it is very secure. As you tighten, you will feel the“wings” tightly pull on the back.
Screw in the screw: Put the screw you want to hang the item (or the screw that comes with the anchor) through the hanging hole of the item, and then screw it into the center hole of the already installed anchor. Tighten to ensure that the item is secure.
Important tips & pitfall avoidance guide: Choose a location:
If you can find the location of the wall stud when drilling the hole, wooden squares or metal studs, you can directly screw long wood screws into the wall studs! The load-bearing capacity of the wall studs far exceeds that of any anchor bolts. Use a nail finder to carefully find the wall studs.
Pay attention to the load-bearing capacity:
Strictly abide by the load-bearing limit of the anchor bolts. When hanging heavy objects (such as TVs and large cabinets), butterfly anchor bolts or multi-point fixation must be used, and ensure that they are fixed to the wall studs.
The size of the drilling hole:
The size of the drilling hole is extremely important. If the hole is too large, the anchor bolt cannot bear the force; if the hole is too small, forcing it in may damage the anchor bolt or the gypsum board. Follow the drill bit size in the manual!
Vertical installation:
Whether drilling holes or screwing in anchor bolts/screws, keep it perpendicular to the wall surface so that the force is even.
Remove old anchor bolts:
Plastic expansion tubes can usually be pulled out by clamping the base with pliers after the screws are unscrewed (a little gypsum may be brought out, and small holes are filled with putty). Self-tapping/screw anchor bolts are unscrewed in the opposite direction. After the butterfly anchor bolts are unscrewed, the“wings” will fall into the wall, and the hole is relatively large and needs to be repaired.
Repair the wall:
Remove the small holes left by the anchor bolts or installation errors? Don't worry! Buy some quick-drying wall repair paste (Spackling Paste), fill it with a scraper, and after it dries, gently sand it smooth with sandpaper, and then add some paint so that it won't be visible.
Summary
Drywall anchors are the first choice for hanging things at home. Understand the characteristics and applicable scenarios of different types of anchors, and choose the right one according to the weight of the items, so you don't have to worry about things falling or the wall being damaged. If you have any questions about drywall anchors or installation, please feel free to contact us, we will provide you with the best solution as soon as possible.

Legal Disclaimer:
MENAFN provides the
information “as is” without warranty of any kind. We do not accept
any responsibility or liability for the accuracy, content, images,
videos, licenses, completeness, legality, or reliability of the information
contained in this article. If you have any complaints or copyright
issues related to this article, kindly contact the provider above.
Most popular stories
Market Research

More Story


Comments
No comment